Posts

Showing posts from February, 2017

Find attached Workflows to a list in SharePoint 2013 using PowerShell

Image
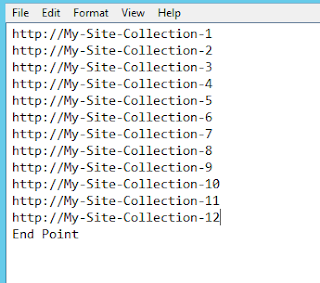
This Script will iterate through all the provided Site Collections and export the attached Workflows with a list in a CSV file. It will also generate a log file that contains the script execution logs. It will export the following items. 1. Site URL 2. Web URL 3. List Name 4. Attached Workflows Count 1.Text file containing database names Create text file with name “DB.txt” in the same directory where script file is present. Write database names in “DB” file.  Make it sure each name should be in new line and write End Point at the end as shown below. 2.Open SharePoint 2013 Management Shell 3.Change directory path Then type ./ WorkflowFinder.ps1 and press enter key. 3. Results 2.        Result will be saved in “WorkflowFinder.csv” file which you can find in the same directory where your script file is located. You can also track the complete log file (named WorkflowFinder -current date and time ) which you can find i

Get All Web Templates Using PowerShell SharePoint 2013

Image
This script will traverse all the site collections and extract its template name. 1.Site Collections File Create text file with name “SiteCollections.txt” in the same directory where script file is present. Write site collections urls in “SiteCollections” file.  Make it sure each url should be in new line and write “End Point” at the end as shown below. 2. Save Code and Run Save below code and Open SharePoint Management Shell. Change the directory to where the code and SiteCollections.txt file is saved and run the code script file. The output would be like below. PS Script: $currentTime = Get-Date -Format o | foreach { $_ -replace ":" , "." } New-Item $PSScriptRoot \GetAllWebTemplates- $currentTime .txt -type file $SiteCollectionArray = Get-Content -Path $PSScriptRoot \SiteCollections.txt Start-Transcript -Path "$PSScriptRoot\GetAllWebTemplates-$currentTime.txt" $UtilStartTime = "Utility Start T

SharePoint 2013 Manual Smoke Testing Guide

Hi, There are thousands of test cases and a lot of ways for testing SharePoint environment after a fresh installation or any upgrade. However, after each farm level change its necessary to smoke test your SharePoint farm to ensure availability, performance, functionality, security and look & feel. I would try to cover as much point as i can to smoke test SharePoint farm with Manual Testing. This could apply to all SharePoint environments including MOSS 2007, SharePoint 2010, SharePoint 2013 or SharePoint 2016. Its possible that i could not cover all of the test scenarios at once, but i'll try to keep updating this post time to time and include new test cases. I would not explain the exact steps to perform a test case here. The purpose of this post is to only highlight the area and components from where SharePoint could be smoke tested. In current scenario i am testing my SharePoint 2013 environment with compare to SharePoint 2010 environment as i have upgrade

SharePoint 2013 Crawl Rules not Excluding Search Results but matching the rules

Image
This issue happened with me in SharePoint 2013 however i believe the resolution would be the same for SharePoint 2010 and SharePoint 2016 environments. Problem: I have SharePoint 2013 environment and i need to remove all the search results under a specific URL. I created a Crawl Rule to Exclude content, in few cases it did not excluded any content and sometimes it excluded only a partial content. I ran an Incremental Crawl each time i create any rule but same results. Scenario:  I have site collection under https://webapplication/pa/b and i want to remove all the search results under this URL. This is how i created the rule. Created the above rule and press OK. Now for testing if this rules matches our query, i have provided it a sample URL and it matches one of our rule. However, when i ran incremental crawl, the target URL was still appearing in my search results which i didn't want. Solution: If it matches your rules but do not

Count All List/Libraries Items Using PowerShell SharePoint 2013

Image
This PowerShell Script will output all items count inside the provided Site Collections list. It will traverse through Site Collections then all sub sites then all list/libraries and output result in a csv file. 1.Site Collections File Create text file with name “SiteCollections.txt” in the same directory where script file is present. Write site collections urls in “SiteCollections” file.  Make it sure each url should be in new line and write “End Point” at the end as shown below. 2.Open SharePoint 2013 Management Shell 3.Change directory path where script file is saved Then type ./ItemsCounter.ps1 and press enter key. It will count all the items of all lists and libraries in site collections which you will provide in “SiteCollection.txt” in first step. 4.Result  Result will be saved in “ItemsCounter.csv” file which you can find in the same directory where your script file is located.  You can also track the complete log file (n

Change Content of Content Editor WebPart Using PowerShell SharePoint 2013

Image
This PowerShell script will change the content of a content editor webpart based on its title. You can change the title of target webpart as well as in PowerShell script too. 1.   Site Collections File Create text file with name “SiteCollections.txt” in the same directory where script file is present. Write site collections urls in “SiteCollections” file. Make it sure each url should be in new line and write “End Point” at the end as shown below. End Point is a reserve word for this script.   2.   Open SharePoint 2013 Management Shell 3.     Change directory path where script file is saved. 4.     Type script name Copy and Save this script with name like ChangeWebPartContent.ps1  and ps1 extention. Type ” ./   ChangeWebPartContent .ps1 –path “directory path\SiteCollections.txt” –overwrite o “ and press enter key. Or Type ” ./   ChangeWebPartContent .ps1 –path “directory path\SiteColl

Convert Classic To Claims Mode Authentication SharePoint 2013

Your SharePoint 2013 users may get Access Denied while accessing a web application which is just got migrated from SharePoint 2010 environment. Mostly this happens due to change in authentication modes as classic mode authentication has been deprecated in SharePoint 2013. Although you can create a classic mode web application using SharePoint Management Shell. This script will work on SharePoint 2013 environment where you have a classic mode web application migrated from SharePoint 2010 or MOSS 2007. Note: If you have more than one Content Databases attached with single web application and you are migrating databases one by one, you have to run this script each time you finish your database migration on SharePoint 2013 environment. This is what i have learned from my recent migration work. More at  https://technet.microsoft.com/en-us/library/gg251985.aspx Convert-SPWebApplication -Identity "http://webapplicationurl" -From Legacy -To Claims -RetainPermissions

Find All Farm Features With Solution Names Using PowerShell SharePoint 2013

Image
This PowerShell script traverse all the custom solutions deployed in Central Admin and the features that get deployed under that solutions.   It exports following items. 1. Solution ID 2. Solution Name 3. Feature ID 4. Feature Name 5. Feature Scope  You can change the paths accordingly.   Start-Transcript "C:\FeatureLogs.txt" $farm = [Microsoft.SharePoint.Administration.SPFarm] :: Local foreach ( $solution in $farm .Solutions) { $solId = ( Get-SPSolution $solution .DisplayName).Id foreach ( $featcher in ( Get-SPFeature | where { $_ .solutionId -eq $solId })) { $SolutionID = $solution .DisplayName $output = $solution .id.GUID + "`t" + $solution .DisplayName + "`t" + $featcher .id.GUID + "`t" + $featcher .DisplayName + "`t" + $featcher .Scope Write-Host $output } } Stop-Transcr